Exterior Hardie Board Installation: A Comprehensive Guide
Embark on the journey of exterior hardie board installation, exploring its numerous benefits and applications. Discover why this material has gained popularity among homeowners seeking durable and aesthetically pleasing solutions for their homes.
Introduction to Exterior Hardie Board Installation
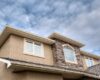
Exterior hardie board, also known as fiber cement siding, is a durable and versatile building material made from a mixture of cement, sand, and cellulose fibers. It is designed to mimic the look of wood siding while offering superior durability and resistance to elements such as moisture, fire, and pests.
Benefits of Exterior Hardie Board
- High durability and longevity
- Resistance to rot, insects, and fire
- Low maintenance requirements
- Variety of styles and textures available
Typical Applications of Exterior Hardie Board
- Residential homes
- Commercial buildings
- Multi-family units
- Historical renovations
Popularity of Exterior Hardie Board
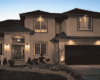
Exterior hardie board has gained popularity among homeowners due to its ability to withstand various weather conditions, its aesthetic appeal, and its long-term cost-effectiveness. With a wide range of colors and textures available, it provides a versatile option for enhancing the curb appeal of any property while offering peace of mind in terms of durability and maintenance.
Preparation for Installation
When installing exterior hardie board, proper preparation is crucial to ensure a successful and long-lasting result. This involves gathering the necessary tools and materials, preparing the surface, and ensuring proper ventilation before beginning the installation process.
Tools and Materials Needed
- Hardie board panels
- Circular saw with a carbide-tipped blade
- Tape measure
- Pencil
- Safety glasses
- Gloves
- Hammer
- Nails or screws
- Level
- Caulk and caulk gun
- Joint flashing tape
Preparing the Surface
Before installing hardie board, it is essential to prepare the surface properly. This involves:
- Clean the surface: Remove any dirt, debris, or old siding from the area where the hardie board will be installed.
- Repair any damage: Fix any damaged areas on the surface and ensure it is smooth and even for proper installation.
- Apply a weather-resistant barrier: Install a weather-resistant barrier, such as building paper or house wrap, to protect the structure from moisture.
- Flash windows and doors: Use flashing tape to seal around windows, doors, and other openings to prevent water intrusion.
Ensuring Proper Ventilation
Proper ventilation is essential when installing hardie board to prevent moisture buildup and ensure the longevity of the installation. Before starting the installation process, make sure to:
- Ensure there are vents in the soffit and eave areas to allow for air circulation.
- Check for any obstructions that may block ventilation and clear them if necessary.
- Consider installing additional vents if needed to promote adequate airflow.
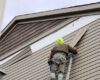
Installation Process

Installing exterior hardie board requires careful attention to detail and following specific steps to ensure a successful outcome. It is essential to adhere to the manufacturer's guidelines throughout the installation process to guarantee the longevity and durability of the hardie board panels.
Properly cutting and fitting the panels is crucial for achieving a seamless finish and maintaining the overall aesthetic of the exterior.
Step-by-Step Guide
- Start by measuring and marking the area where the hardie board panels will be installed.
- Use a circular saw with a diamond-tipped blade to cut the panels to the required size.
- Pre-drill holes in the panels to prevent cracking during installation.
- Secure the panels to the exterior surface using corrosion-resistant nails or screws.
- Overlap the panels according to the manufacturer's instructions to ensure proper water drainage.
- Finish by sealing the joints with caulk to prevent water infiltration.
Proper Cutting and Fitting
- Measure twice and cut once to avoid wastage of materials.
- Use a carbide-tipped scoring knife to score the panels before snapping them for a clean break.
- Ensure a 1/8-inch gap between panels for expansion and contraction due to temperature changes.
- Fit the panels snugly together to create a seamless look and prevent moisture penetration.
Finishing Touches and Maintenance

When it comes to finishing touches for your exterior hardie board installation, there are various options available to enhance the overall look of your home. Additionally, proper maintenance is essential to ensure the longevity of the hardie board and protect it from wear and tear.
Finishing Options
- Painting: Hardie board can be painted in a wide range of colors to match your home's aesthetic. Make sure to use high-quality exterior paint for durability.
- Staining: If you prefer a more natural look, staining the hardie board is a great option. Stains can enhance the wood-like texture of the board.
- Trim and Molding: Adding trim and molding can create a polished finish and add architectural detail to your home's exterior.
Painting or Staining Tips
- Prepare the Surface: Clean the hardie board thoroughly and make any necessary repairs before painting or staining.
- Use the Right Products: Choose paint or stain specifically formulated for hardie board to ensure proper adhesion and longevity.
- Follow Instructions: Always follow the manufacturer's instructions for application and drying times to achieve the best results.
Maintenance Tips
- Regular Cleaning: Periodically clean the hardie board with a mild detergent and water to remove dirt and grime.
- Inspect for Damage: Check for any signs of damage, such as cracks or chips, and repair them promptly to prevent further issues.
- Recaulk as Needed: Over time, caulk may deteriorate, so make sure to recaulk joints and seams to maintain the weatherproofing of the installation.
Final Conclusion
In conclusion, the finishing touches and maintenance tips provided ensure a long-lasting and visually appealing exterior hardie board installation. This guide equips you with the knowledge needed to tackle this project with confidence and efficiency.
Expert Answers
How do I prepare the surface for exterior hardie board installation?
Ensure the surface is clean, dry, and free of any debris or contaminants before starting the installation process.
Can I paint or stain hardie board?
Yes, you can paint or stain hardie board to customize its look and enhance its aesthetic appeal.
What are the common finishing options for exterior hardie board?
Common finishing options include painting, staining, or leaving the natural color of the hardie board exposed.